Little Longhorn – Part 5 – Changed focus

As I mentioned on my last post, another developer (Allan Hansen) have joined the project. We have done a lot of work in getting a pretty solid foundation/engine to build the game on. Not that it’s “done”, far from, but we have something now that should save us time in the long run. This means that we have invested a lot of time in getting this done, without actually getting forward with the actual game play.

Now, after the project have been on hold for some time, we have started up again, this time with a changed focus. We will now focus more on getting implemented the different features of the game, instead of keep building on the foundation/engine (non visual stuff). This way we can see progress as the game play will evolve, both our self, but also when we show the game to others. This way we can start pretty soon to get feedback from people, even though the game is young.

[more]

Hopefully this will also helps us show it off to our girlfriends and maybe, just maybe, have them to say something positive about it. Usually, girlfriends don’t see the über in two red boxes colliding or a long talk about path following algorithms :)

Let’s see how it goes with this new change of focus. We started up this week and we already have implemented some nice stuff. Here is a screenshot of how the game currently looks. Keep in mind that all the graphics is just dummy sprites from various sources so we have something to test with as we develop.

image

New theme on the blog

Some time ago I decided I wanted a new theme on my blog as I got tired of the old one. So, I started looking/searching for a nice theme for BlogEngine that I could use. After about 15 min. I had found ALL themes for BlogEngine on the web…very disappointed! I don’t know why, but there is very few themes for this blog engine out there. Why? I really don’t know, because it’s actually pretty easy to make them. Basically what I found was this: http://www.dotnetblogengine.net/page/themes.aspx which have 4 links to sites that have some themes each. It’s NOTHING compared to Word Press.
As I got through the first 3 links on the link above I got more and more sad. Then I got to the 4. one http://www.jankoatwarpspeed.com. This blog didn’t had a nice theme as a download, but it had a really nice looking theme on the blog it self. Through Twitter I contacted Janko Jovanovic which is the owner of the blog and creator of the theme. I asked which theme the theme were based on and he told me it were made by himself. Dammit, were my first thought :) I then asked if he would share the theme with me and he said that I could get inspired by it. So I did. :)

[more]

Making my own theme

So, I knew how my theme were basically going to look (it’s still not finished and will get even further away from Janko’s design as I figure out new stuff I want on my blog over time), now I just needed to figure out how to make a theme in BlogEngine. I found two links which is basically what you need to know to make a theme for BlogEngine. First a video by Al Nyveldt about how you create a theme and secondly the documentation of BlogEngine to figure out which snippets you need to insert to get the right stuff on your pages in the theme.

http://www.nyveldt.com/blog/post/BlogEngineNET-Creating-Themes-Webcast.aspx
http://blogengine.codeplex.com/wikipage?title=ThemeCreation&referringTitle=Documentation

Besides the above links, I also looked a lot in the source of the “Standard” theme that ships with the BlogEngine source code.
After some hours I had a pretty cool theme, at least I think :)

Next step

The next step to improving my blog is to Search Engine Optimize it. I will use the IIS SEO Toolkit from Microsoft which ScottGu blogged about a few weeks ago. IIS Search Engine Optimization Toolkit.

As my blog is right now, as I’m writing here, the SEO kit tells me the following, which is what I have to work on now :)
Let’s see how many of these I can make go away, hopefully a lot. I’ll blog about the result later on.

image

Auto linking in Windows Live Writer

Windows_Live_Writer_logoI know this could be old news to a lot out there, but I just discovered this feature here the other day and it’s actually pretty smart. Windows Live Writer has a feature called “Auto Linking”, which is found in Tools>Options>Auto Linking.

[more]

image

From here you can set up which words you want to be automatically made into a link when typed. For instance I have setup Silverlight to go to the Silverlight home page and open in a new windows. As a general setting, I have setup to only auto link once per post, which is why the second “Silverlight” in the above line isn’t made to a link.

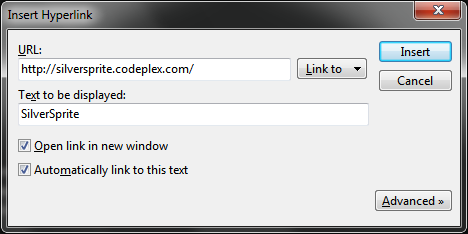
Another way to put in words for auto linking is done through the “Insert Hyperlink” window when you are creating a link in your post. Lets say that I write SilverSprite in my blog post and want it to be a link in this post, but I also want it to auto link the next time I write it in another post. Then I mark the text, SilverSprite, as normally and put in the URL in the Insert Hyperlink dialog. Then I check the “Automatically link to this text” box, which will put in this word in my auto linking list – it’s really easy and neat :)

image

This Auto Linking feature is pretty smart if you often write the same words in your blog posts and don’t want to manually create a link for it each time.